

This getting started is for developers who want to create a telegram chatbot with Java. There are many articles on the internet explaining how to create a chatbot based on the so-called LongPollingBot. But development works much faster and easier with the AbilityBot, which will be our topic for today.
In the course of the article we are going to build a simple chatbot that reminds its users every two days to work out. The result will look something like this:
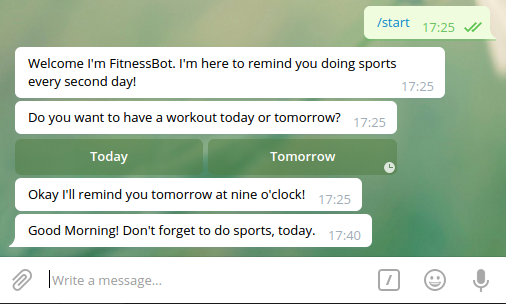
Even with this simple example, we can take a look at a bunch of great features provided by the Telegram API and more specific via AbilityBot. In a nutshell, those features are:
- Replying to commands like
/start - Using inline keyboards like in the picture above
- making use of the embedded database in ability bot
- and as an extra: Repeated execution of tasks at a specific time
If you don’t want to work yourself through the whole article, feel free to take a look at the finished code on github.
Okay then, let’s start coding!
Project setup
For the AbilityBot to work, you need to set up a Maven project in a Java 8 environment. In case you have never done that before, head over to Maven’s getting started and setup a new maven project. In your pom.xml add the following two dependencies:
<dependencies>
        <dependency>
                <groupId>org.telegram</groupId>
                <artifactId>telegrambots</artifactId>
                <version>3.6.1</version>
        </dependency>

        <dependency>
                <groupId>org.telegram</groupId>
                <artifactId>telegrambots-abilities</artifactId>
                <version>3.6.1</version>
        </dependency>
</dependencies>
Ensure that you are using at least Java 8 by adding the following build plugin to your pom:
<build>
        <plugins>
                <plugin>
                        <groupId>org.apache.maven.plugins</groupId>
                        <artifactId>maven-compiler-plugin</artifactId>
                        <configuration>
                                <source>8</source>
                                <target>8</target>
                        </configuration>
                </plugin>
        </plugins>
</build>
Getting your bot to talk
At first, we create our bot class called FitnessBot. It extends the class AbilityBot thus we need to call super() on the constructor and override the method creatorId(). Furthermore we added another constructor without any arguments, thus we can easily instantiate our bot.
public class FitnessBot extends AbilityBot {

    public FitnessBot() {
        this(Constants.BOT_TOKEN, Constants.BOT_USERNAME);
    }

    private FitnessBot(String botToken, String botUsername) {
        super(botToken, botUsername);
    }

    @Override
    public int creatorId() {
        return Constants.CREATOR_ID;
    }
}
At the latest when you paste this code into your IDE, you will recognize the unresolved reference to an interface called Constants. It is a common software pattern widely used in Android for example. The interface contains all the constant values needed by your application to function properly. Later we will use it for all our text responses, database identifiers, and similar stuff. In order to fix your code for now, create a new interface and paste the following lines.
public interface Constants {
    // Initialization
    String BOT_USERNAME = "FitnessBot";
    String BOT_TOKEN = "your-super-secret-token";
    int CREATOR_ID = your-telegram-user-id;
}
You need to replace the information with the ones @BotFather gave to you. If you don’t know what I’m talking about please refer to this tutorial. It contains information on how to create a new Telegram bot.
Running your bot
Before you can run your bot you have to initialize it. Therefore we create a new class called Application and fill it with a main() method containing the code to initialize your bot. This block is copied from the Github documentation of ability bot.
public class Application {

    public static void main(String[] args) {
        // Initializes dependencies necessary for the base bot
        ApiContextInitializer.init();

        // Create the TelegramBotsApi object to register your bots
        TelegramBotsApi botsApi = new TelegramBotsApi();

        try {
            // Register your newly created AbilityBot
            FitnessBot bot = new FitnessBot();
            botsApi.registerBot(bot);

        } catch (TelegramApiException e) {
            e.printStackTrace();
        }
    }
}
Now you can run your bot but he won’t answer, yet. In the next step, we change this by developing the first ability: A response to the command /start. Therefore, you have to add the following method to your FitnessBot class.
public Ability replyToStart() {
    return Ability
        .builder()
        .name("start")
        .info(Constants.START_DESCRIPTION)
        .locality(ALL)
        .privacy(PUBLIC)
        .action(ctx ->  silent.send("Hello World!", ctx.chatId()))
        .build();
}
In Constants add:
String START_DESCRIPTION = "Start using the fitness bot to remind you doing sports";
I don’t want to go into detail on the specific methods chained here because they are pretty well explained in the already linked documentation.
But here are some information explaining action() more thoroughly. ctx is the message context and provides related information like the chatId of the message. To reply to a message you have to call a method on either object silent or sender. Both are provided by the parent class AbilityBot. As you can see in our code, currently we are using the silent object. The difference is that while silent is used to send plain text messages only, sender gives you more freedom on how to compose your reply. As you will learn later, inline keyboards, for example, need to use sender. The downside of sender is that more freedom leads to more responsibility. Exceptions might occour and you have to handle them by yourself.
Database usage and state handling
State handling and properly saving that state to a database can get pretty complex. So it makes sense to create a separate class for that concern. Therefore we build a new class ResponseHandler which will be responsible for processing requests:
public class ResponseHandler {
    private final MessageSender sender;
    private final Map<Long, State> chatStates;

    public ResponseHandler(MessageSender sender, DBContext db) {
        this.sender = sender;
        chatStates = db.getMap(Constants.CHAT_STATES);
    }
}
In it’s constructor, the ResponseHandler receives the database context called db. The instance, which is going to be created using the constructor, will become a field in our FitnessBot class. Field sender will be used to send messages back to the user. As you can see, the state of the bot is saved separately for each chat in a Map called chatStates.
The next step is to add a new entry to our Constants interface:
String CHAT_STATES = "CHAT_STATES"
This is the name of the table created internally by the embedded database. Pretty simple. You can read and even update the map chatStates as you wish and it will be synced with the database automagically.

If you wondered about State-class: This is an enum containing our set of states for the bot. Currently, just a single one which says that we are waiting for the user to reply.
public enum State {
    AWAITING_TRAINING_DAY
}
To make use of the whole new code we need to initialize our ResponseHandler in the bot class. We do that using a new field inside of FitnessBot.
private final ResponseHandler responseHandler;

public FitnessBot(String botToken, String botUsername) {
        super(botToken, botUsername);
        responseHandler = new ResponseHandler(sender, db);
    }
Now we need to replace the action() method in our replyToStart() ability with
.action(ctx -> responseHandler.replyToStart(ctx.chatId()))
But our ResponseHandler doesn’t have the referenced method, so far. You can find it below.
public void replyToStart(long chatId) {
        try {
                sender.execute(new SendMessage()
                        .setText(Constants.START_REPLY)
                        .setChatId(chatId));
                chatStates.put(chatId, State.AWAITING_TRAINING_DAY);
        } catch (TelegramApiException e) {
                e.printStackTrace();
        }
}
And our text is saved in Constants:
String START_REPLY = "Welcome I'm FitnessBot. I'm here to remind you doing sports every second day!";
If you run the application now and issue /start our newly added text will appear!
Using inline keyboards
Chances are that you will use more than one inline keyboard. That’s why we create a new class called KeyboardFactory. This class will create the needed keyboard instances for us. The code is pretty self-explanatory but see for yourself.
public class KeyboardFactory {
    public static ReplyKeyboard withTodayTomorrowButtons() {
        InlineKeyboardMarkup inlineKeyboard = new InlineKeyboardMarkup();
        List<List<InlineKeyboardButton>> rowsInline = new ArrayList<>();
        List<InlineKeyboardButton> rowInline = new ArrayList<>();
        rowInline.add(new InlineKeyboardButton().setText(Constants.TRAINING_TODAY).setCallbackData(Constants.TRAINING_TODAY));
        rowInline.add(new InlineKeyboardButton().setText(Constants.TRAINING_TOMORROW).setCallbackData(Constants.TRAINING_TOMORROW));
        rowsInline.add(rowInline);
        inlineKeyboard.setKeyboard(rowsInline);
        return inlineKeyboard;
    }
}
And in our Constants file we add:
String TRAINING_TODAY = "Today";
String TRAINING_TOMORROW = "Tomorrow";
String FIND_TRAINING_DATE = "Do you want to have a workout today or tomorrow?";
Now we can just call the static method of our factory to make use of an inline keyboard. The most important code part is setCallbackData(). It defines an identifier to recognize which button has been clicked by the user. Hint: In a real world application it might not be too smart to use the button text as identifier for a callback but we use it here to simplify the code.
Now we need to use the keyboard in our response by adding another sender.execute() below the first one which we already defined.
public void replyToStart(long chatId) {
        try {
            sender.execute(new SendMessage()
                .setText(Constants.START_REPLY)
                .setChatId(chatId));

            sender.execute(new SendMessage()
                .setText(Constants.FIND_TRAINING_DATE)
                .setChatId(chatId)
                .setReplyMarkup(KeyboardFactory.withTodayTomorrowButtons()));

            chatStates.put(chatId, State.AWAITING_TRAINING_DAY);

        } catch (TelegramApiException e) {
                e.printStackTrace();
        }
}
Give it a try! Our bot will now offer an inline keyboard to answer the training day question.
Inline keyboard interactions
So far we aren’t able to recognize clicks on the two buttons. But we can give our FitnessBot a new ability to do so! Similar to the image reply example given by Telegram we can filter for button responses via Flag.CALLBACK_QUERY. All the identifiers of clicked buttons will be sent inside of the update object upd. This object contains a lot of data but luckily there are some helper methods to extract the important information conveniently. getChatId(upd) will find the chat id of the update for you and via AbilityUtils.getUser(upd) you can get the author of the message.
Add the following lines to your bot class.
public Reply replyToButtons() {
        Consumer<Update> action = upd -> responseHandler.replyToButtons(getChatId(upd), upd.getCallbackQuery().getData());
        return Reply.of(action, Flag.CALLBACK_QUERY);
}
The tricky part here is the implementation of replyToButtons() inside of responseHandler because every single button click will be processed in this method. That’s why we use it for separation of concerns only.
public void replyToButtons(long chatId, String buttonId) {
        try {
                switch (buttonId) {
                        case Constants.TRAINING_TODAY:
                                replyToTrainingToday(chatId);
                                break;
                        case Constants.TRAINING_TOMORROW:
                                replyToTrainingTomorrow(chatId);
                                break;
                }
        } catch (TelegramApiException e) {
                e.printStackTrace();
        }
}
The actual logic resides in the referenced methods. First, it validates whether the bot is currently in a state where it is waiting for a response. Only if this is the case, the button is clicked. Depending on which button has been pressed, the bot is moved to another state.
private void replyToTrainingToday(long chatId) throws TelegramApiException {
        if (chatStates.get(chatId).equals(State.AWAITING_TRAINING_DAY)) {
                sender.execute(new SendMessage()
                        .setText(Constants.TRAINING_TODAY_REPLY)
                        .setChatId(chatId));
                chatStates.put(chatId, State.TODAY_IS_TRAINING_DAY);
        }
}

private void replyToTrainingTomorrow(long chatId) throws TelegramApiException {
        if (chatStates.get(chatId).equals(State.AWAITING_TRAINING_DAY)) {
                sender.execute(new SendMessage()
                        .setText(Constants.TRAINING_TOMORROW_REPLY)
                        .setChatId(chatId));
                chatStates.put(chatId, State.TODAY_IS_RELAX_DAY);
        }
}
The two referenced states are new thus have to be added to our enum:
public enum State {
    AWAITING_TRAINING_DAY, TODAY_IS_TRAINING_DAY, TODAY_IS_RELAX_DAY
}
Depending on the clicked button we want to answer something different. As usual, we need to add the answers to Constants:
String TRAINING_TODAY_REPLY = "Okay then take this as a reminder ;)";
String TRAINING_TOMORROW_REPLY = "Okay I'll remind you tomorrow at nine o'clock!";
Extra: Scheduled task execution
Now we need a way to remind our users to do sports on their training days. For that, we make use of ScheduledExecutorService from Java’s concurrent package. We’re not going to go into detail here, as it is not part of the bot framework. You just need to know that with the class below we have an easy way to execute a task at a specific time on a daily basis. E.g. to write a message at 9am in the morning. Create a new class called DailyTaskExecutor:
public class DailyTaskExecutor {
    private final ScheduledExecutorService executorService;
    private final DailyTask dailyTask;

    public DailyTaskExecutor(DailyTask dailyTask) {
        this.executorService = Executors.newScheduledThreadPool(1);
        this.dailyTask = dailyTask;
    }

    public void startExecutionAt(int targetHour, int targetMin, int targetSec) {
        Runnable taskWrapper = () -> {
            dailyTask.execute();
            startExecutionAt(targetHour, targetMin, targetSec);
        };
        long delay = computeNextDelay(targetHour, targetMin, targetSec);
        executorService.schedule(taskWrapper, delay, TimeUnit.SECONDS);
    }

    private long computeNextDelay(int targetHour, int targetMin, int targetSec) {
        LocalDateTime localNow = LocalDateTime.now();
        ZoneId currentZone = ZoneId.systemDefault();
        ZonedDateTime zonedNow = ZonedDateTime.of(localNow, currentZone);
        ZonedDateTime zonedNextTarget = zonedNow.withHour(targetHour).withMinute(targetMin).withSecond(targetSec);
        if(zonedNow.compareTo(zonedNextTarget) >= 0)
            zonedNextTarget = zonedNextTarget.plusDays(1);

        Duration duration = Duration.between(zonedNow, zonedNextTarget);
        return duration.getSeconds();
    }

    public void stop() {
        executorService.shutdown();
        try {
            executorService.awaitTermination(1, TimeUnit.DAYS);
        } catch (InterruptedException ex) {
            Logger.getLogger(DailyTaskExecutor.class.getName()).log(Level.SEVERE, null, ex);
        }
    }
}
DailyTask is an interface with an execute() method. We have to create an implementation of this interface later.
public interface DailyTask {
    void execute();
}
But first, let’s create an instance of DailyTaskExecutor in our FitnessBot class as a new field. As soon as we have our instance we schedule a new task which will run every morning at 9 am using startExecutionAt().
    private final DailyTaskExecutor dailyTaskExecutor;

    private FitnessBot(String botToken, String botUsername) {
        super(botToken, botUsername);
        responseHandler = new ResponseHandler(sender, db);
        dailyTaskExecutor = new DailyTaskExecutor(new MorningReminderTask(this));
        dailyTaskExecutor.startExecutionAt(9, 0, 0);
    }
Okay, now we need a new class for our DailyTask interface. We call it MorningReminderTask and it takes a callback listener as a constructor parameter. This callback listener is part of the class itself and gets called as soon as execute() will be run.
public class MorningReminderTask implements DailyTask {

    public interface Callback {
        void onTimeForMorningTask();
    }

    private final Callback callback;

    public MorningReminderTask(Callback callback) {
        this.callback = callback;
    }

    @Override
    public void execute() {
        callback.onTimeForMorningTask();
    }
}
Now you should have a compile error in your bot class because you try to pass your bot as a reference for callback in the constructor of MorningReminderTask. Before you can do that you need to implement MorningReminderTask.Callback in your bot.
public class FitnessBot extends AbilityBot implements MorningReminderTask.Callback {

    @Override
    public void onTimeForMorningTask() {
        responseHandler.sayMorningMessages();
    }
}
Due to that interface, you need to override onTimeForMorningTask() method. As our response handler class is taking care of writing messages we just call one of its methods. Which we have to create now:
public void sayMorningMessages() {
        try {
            for (long chatId : chatStates.keySet()) {
                switch (chatStates.get(chatId)) {
                    case TODAY_IS_TRAINING_DAY:
                        processTrainingDay(chatId);
                        break;
                    case TODAY_IS_RELAX_DAY:
                        processRelaxDay(chatId);
                        break;
                }
            }
        } catch (TelegramApiException e) {
            e.printStackTrace();
        }
    }

    private void processTrainingDay(long chatId) throws TelegramApiException {
        sender.execute(new SendMessage()
                        .setText(Constants.TRAINING_REMINDER)
                        .setChatId(chatId));
        chatStates.put(chatId, State.TODAY_IS_RELAX_DAY);
    }

    private void processRelaxDay(long chatId) {
        chatStates.put(chatId, State.TODAY_IS_TRAINING_DAY);
    }
In the constants file:
String TRAINING_REMINDER = "Good Morning! Don't forget to do sports, today.";
For each chat, we will now send a reminder message if we are in TODAY_IS_TRAINING_DAY state. Furthermore, we are changing the state to the opposite, so every second day will be a training day.
And that’s it. Now your bot is able to remind you every second day to do sports. Feel free to leave a comment if you have any questions or suggestions. You can find the whole code of this getting started on our github profile.
Greets,
Domi