

Motivation
…Hey, guys! It’s time for another blog post from me. This time I want to write about my experiences with Flutter and Dart. Every software developer is regularly confronted with new concepts, frameworks or languages, so am I. I learned to program with Android 2.0. Yes, I’m getting old… Meanwhile, I am not so active in the Android world anymore. But since we code Android apps on hackathons every now and then, I don’t get out of practice. Nevertheless, I am a little spoiled by the development of UWP apps. Also, the time on hackathons is very limited, which is why one does not like to deal with boilerplate code. Let’s be honest… Android (Java) is full of it! Therefore, alternatives are needed. Okay, so it would be obvious to try Xamarin now, but where would be the fun? I have no plans this weekend and Google seems to have created a real alternative with Flutter and Dart! Sounds like a hot date ? I’ve never worked with Dart or Flutter before, but at some point, you have to start. So this post will be about my experiences and not a tutorial.
So what are the advantages of Flutter?
Google promises not only that you can develop apps very fast, but also that they run on iOS like Android. In addition, Dart and Flutter are focused on developing reactive apps. I’ve never written apps in a reactive manner before, but at least the theoretical foundations were covered at our university. *Yes, Dannymausi I’m talking about the hipster teacher 😉 *
And what do I want to program?
I’ve been thinking for a long time what I can achieve in less than two days (hitting the gym and watching Netflix is still important!). I don’t know the language or the framework…. But yolo , after all, Google promises that you are significantly faster in developing. So here’s the idea: We’ve finished the first rotation of our blog posts. We came up with the idea that once every member of us has written a blog post we select the best and the winner gets a little something. Basically, this means we have to make a voting every 5 to 6 weeks. There is one catch: Since Danny is from Russia we have to very be very cautious about our voting system. We had so many different voting systems… I can’t even count them! We even voted about how to vote… Time to time we vote with two or three voting shares. Sometimes we have several voting rounds. Since we always discuss and try to optimize our voting systems, it’s time for an App. The app should allow you to vote for one of the five possible authors (including yourself). After you have voted, the application navigates to a second page where you can see the election results. You can not vote again. However, a new election can be started, this must be propagated to all clients.
Getting Started
So now I have two days to try out a new language and a new framework….. What the hell am I doing to myself ?? So that it won’t be too unpleasant, I decided to chill on YouTube first. Fortunately, the Google IO 18 wasn’t so long ago and there are interesting talks about Flutter. Here are the ones I looked at:
So what should you take out of these videos? On the one hand Flutter is about widgets – everything is a widget. A screen is a widget tree. One distinguishes between Stateless and Statefull widgets. But we will use the BLOC pattern from “Build reactive mobile apps with Flutter” for our app.
On the other hand, Firebase seems to offer itself perfectly as a backend. As this blog post is not a tutorial, I recommend to watch the videos. Our task is to create a Firebase database. And to create a client according to the BLOC pattern.
Implementation
The Backend alias Firebase
So this is the easy Part. Since I have already written such a long motivation, how about a gif?

How to create the Backend 😉
The Voting Screen
To keep the code manageable I decided to write all widgets in the main.dart file. In a real project you would surely divide them into different files but for experimenting, I think it’s better to keep everything at one place. Since time is limited, I thought we’d keep the layout simple. Here is my design:

Lets Check:
- We have a ListView
- We have an AppBar with Title
That’s what I call minimalistic 🙂
After I haven’t committed to any tutorial here, I don’t want to go into the exact structure of the code. Much more interesting is how we build our UI based on the authors in Firebase. First, we have to connect Firebase to our app. Just follow the instructions on Firebase or watch this video.
From Firebase to Voting
But what is the right place to read from the database? If we follow Google’s BLOC patterns, we need a stream. Using this stream, information from our database will flow straight into our UI. So we don’t have to hold a state. But what if we need information from the database? So not the information from the database flows into the UI but rather the UI pulls information from the database? To solve this elegantly, we would need a short-term memory. Therefore we will let the stream from the Firebase database flow into a so-called BehaviorSubject. This BehaviorSubject can always return the last element seen on request. So it holds our state.
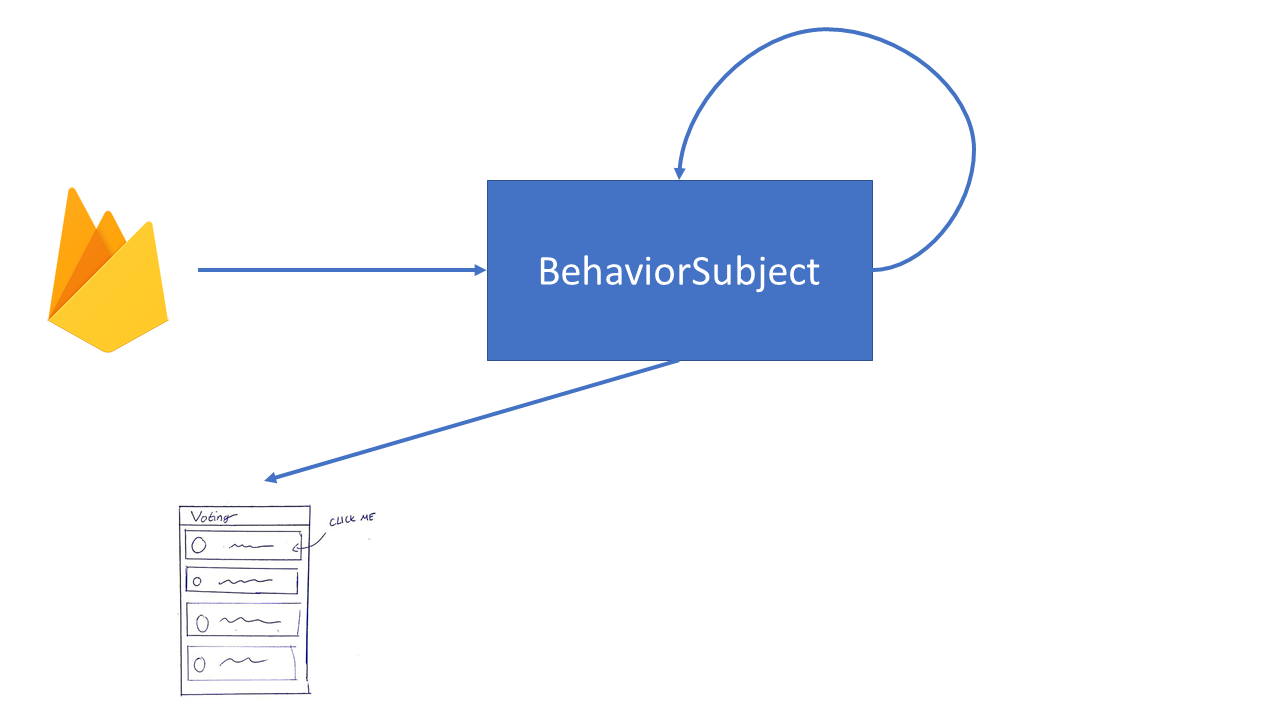
Finally, we need a so-called StreamBuilder in our view. The StreamBuilder builds itself on the latest snapshot interaction with the specified stream an whose build strategy is given by a builder. So lets look at the code:
    class Bloc {
            final BehaviorSubject<QuerySnapshot> _firebaseSubject =
                    BehaviorSubject<QuerySnapshot>(seedValue: null);

            Bloc() {
                _firebaseSubject.addStream(Firestore.instance.collection("AuthorVotes").snapshots());
            }

            Stream<QuerySnapshot> get firebaseStream => _firebaseStream.stream;
    }
Here we connect the BlocClass with the Firebase Database alias Firestore
    class AuthorGrid extends StatelessWidget {
  @override
  Widget build(BuildContext context) {
    final bloc = BlocProvider.of(context);
    return new StreamBuilder(
      stream: bloc.firebaseStream,
      builder: (context, snapshot) {
        if (snapshot != null && !snapshot.hasData) return const Text('Loading...');
        return ListView.builder(
          itemCount: snapshot.data.documents.length,
          itemBuilder: (context, index) =>
            _buildItem(context, snapshot.data.documents[index]),
        );
      },
    );
  }
Here we build a widget based on the stream comming from our blocclass
But wait?! Where comes the BlocClass from? You’re right, the BlocClass itself is also a kind of state we need to have manage. Although the UI of this app is manageable and I could have passed the bloc object through the tree as a parameter, there are better alternatives. With the help of an inheriting widget we are able to reach the object from the entire subtree.
From Voting to Firebase
But How do we get updates to the Firebase? Actually, it’s pretty easy. We just have to let a stream flow in the opposite direction. For this purpose we create a stream controller in our BlocClass. The StreamController controls our stream. It allows to feed events into the stream via a sink as well as to consume the stream by calling the stream methode. All we have to do is: (1) A Click on the list submits an event to the stream. (2) Consume this stream and start a Firebase transaction at the appearance of a event.
class Bloc {
  final StreamController<Vote> _voteController = StreamController<Vote>();

  Bloc() {
    _voteController.stream.listen((data) => commitToFireBase(data));
  }

  Sink<Vote> get voteSink => _voteController.sink;

  void commitToFireBase(Vote vote) {
    Firestore.instance.runTransaction((transaction) async {
      DocumentSnapshot freshSnap = await transaction.get(vote.votedAuthor.reference);
      await transaction.update(freshSnap.reference, {'Votes': freshSnap['Votes'] + 1});
    });
  }
}
This is all we need in our BlocClass. As you can see the voteSink is the place to commit new Events to our Stream. In the Constructor of this Class, we say that the stream is consumed by a function, which is also defined within the Blocclass. In this function, we start a transaction to safely increment the votes for the author by one. Notice how the actual Author is provided by the vote event itself.
Widget _buildItem(
    BuildContext context, DocumentSnapshot document, AuthorBloc authorBloc) {
  return new AuthorSquare(
    author: document['Author'],
    imageUrl: document['Image'],
    onTab: () {
      bloc.voteSink.add(Vote(document));
    },
  );
}
As you can see we just add a new vote event. There is no logic in the UI – all is done by in the BlocClass.
Navigation
I know the blog post is getting long and I said it won’t be a tutorial. But there’s another detail I want to work out. This has given me the most stuggle and I’m sure there are more elegant ways to solve it. Nevertheless, I would like to share and discuss my solution with you. The challenge I encountered was navigation. Yeah, Flutter’s got a pretty well-designed system for navigation. But what I want is more than the standard requirements. So here a some requirements which I had set for myself:
- As a voter, after making my choice, I don’t want to be able to re-vote.
- As a voter, when I open the application I want to see the election results directly, if I have already voted.
- As a voter, I want to be brought directly to the polls from the election results if there is a new election.
- As a noob in reactive programming, I don’t want the navigation logic to be located in the view.
Well, as you can see, I didn’t make my life easy. One difficulty was to get the BuilderContext from the widget into the blocClass. However, you need the BuilderContext to create a new route. In Flutter Navigation is based on so called “Routes”. A Route is a mapping from a name to a widget. The Navigator managed this routes by adding or removing them from the navigation stack. So first we needed to get the BuildContext to the blocClass. For this we can use a BehavoirSubject again. When we create a widget, we pass the BuildContext as an event. Since a BehavoirSubject always remembers the last element seen, we are always able to navigate. Furthermore we can pass the widget we wish to navigate to into another stream. If we combine both streams, we have everything we need to navigate.
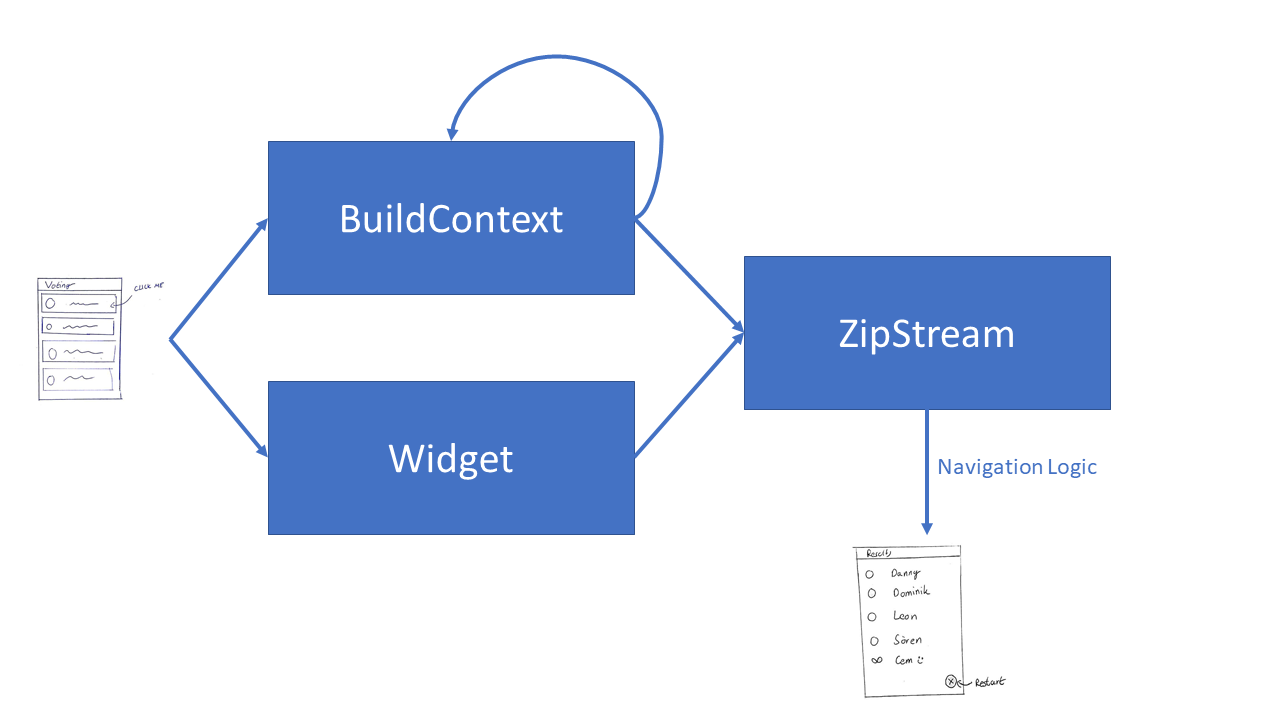
It is important that we do not use BehaviorSubject for the widget stream. We can’t remember the last widget we saw. Otherwise we would end up in an endless navigation. Therefore we use a StreamController for the wigetstream. The BuildContextStream and the WidgetStream are fed into a zipper. The zipper then packs the elements from the two streams into a tuple and the cool thing is: Since we use a BehaviorSubject for the BuildContext, we always get a context here. But since the widget comes via aStreamController, a tuple is only generated if we actually have passed a widget somewhere in our code into the stream.
class Bloc {
  final StreamController<Widget> _widgetController = StreamController<Widget>();

  final BehaviorSubject<BuildContext> _contextStream =
      BehaviorSubject<BuildContext>(seedValue: null);

  AuthorBloc() {
    Observable
        .zip2(_widgetController.stream, _contextStream.stream,
            (a, b) => new Tuple2<Widget, BuildContext>(a, b))
        .listen((data) => _navigate(data));
  }

  Sink<BuildContext> get contextSink => _contextStream.sink;
  Sink<Widget> get wigetSink => _widgetController.sink;

  void _navigate(Tuple2<Widget, BuildContext> tuple) {
    Navigator.pushReplacement(tuple.item2,
        new MaterialPageRoute(builder: (BuildContext context) => tuple.item1));
  }
}
If you look at the picture from above, the code is quite straightforward. If you want to navigate simply pass the widget to navigate to. For example, when we realize that the voting results have been thrown away:
void _checkForEmptyVotes(QuerySnapshot data) {
  int votes =
      data.documents.map((snap) => snap.data['Votes']).fold(0, (a, b) => a + b);

  if (votes <= 0) wigetSink.add(new MyHomePage());
}
You’re wondering where this code is coming from again? Easy, actually. Since we already have a stream from the database, we just have to let it flow into this function. With each database update, the system checks whether navigation is required.
The other requirements are now also easy to implement. We simply write in the local settings whether we have already selected. If so, we pass the corresponding widget the stream and already we navigate.
The Result
Time for a gif!
- You can only vote once ?
- If someone votes, all devices are getting the update ?
- When a new election is started, all devices navigate to the election.?
Reflection
That’s been a great two days! Even though I had to fight with a lot of initial pain, I am glad to have chosen this topic. By initial pain, I mean trivial things like spending a lot of time for googling the basics of Dart, being depressed from simple compile errors or even setting up Flutter and Dart on my Computer. Despite still pending refactoring I am also relatively satisfied with the code. Even if I will hate myself for this code in a month 🙂 The concept behind Flutter is simply great so far! Personally, I find the development experience much more satisfying than vanilla Android with Java/Kotlin. I also liked Dart as a programming language very much. I liked the tooling around Flutter, too. By the way, I used Visual Studio code.
Well I will surely change some code and build some model classes. Also I didn’t care about the design yet. But there seems to be still a lot to discover here. After all, Flutter is there to build beautiful apps! I am not yet satisfied with the navigation either. For example, I don’t like my solution, which is waiting for an update of Firebase (also for the device that requested a new voting). But you will certainly read more of me and Flutter ❤
Feel free to check out the GitHub repo