This post is intended for beginners of i3 or more specifically Regolith. Since i3 is just a window-manager and not a fully fletched desktop environment you might have encountered some issues using a pure version of i3.
Regolith is a modern desktop environment that saves you time by reducing the clutter and ceremony that stand between you and your work. Built on top of Ubuntu and GNOME, Regolith stands on a well-supported and consistent foundation. (from Regolith website)
Regolith on the other hand integrates i3 into Ubuntu and Gnome. Even though I didn’t expected it, Regolith really works like a charme. The only thing that can be tricky on first sight is customization and that’s what we’re going to tackle right now!
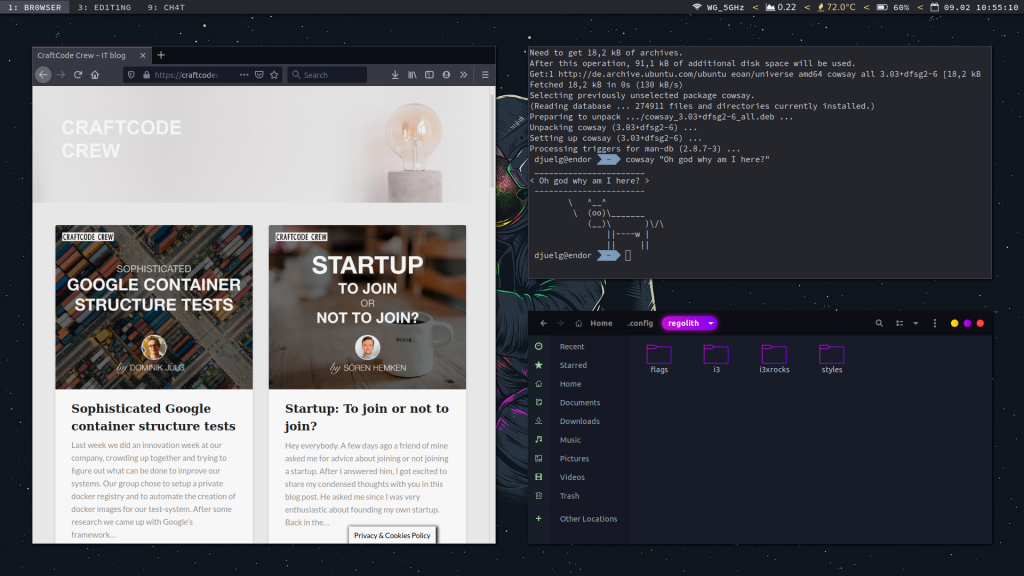
Preview
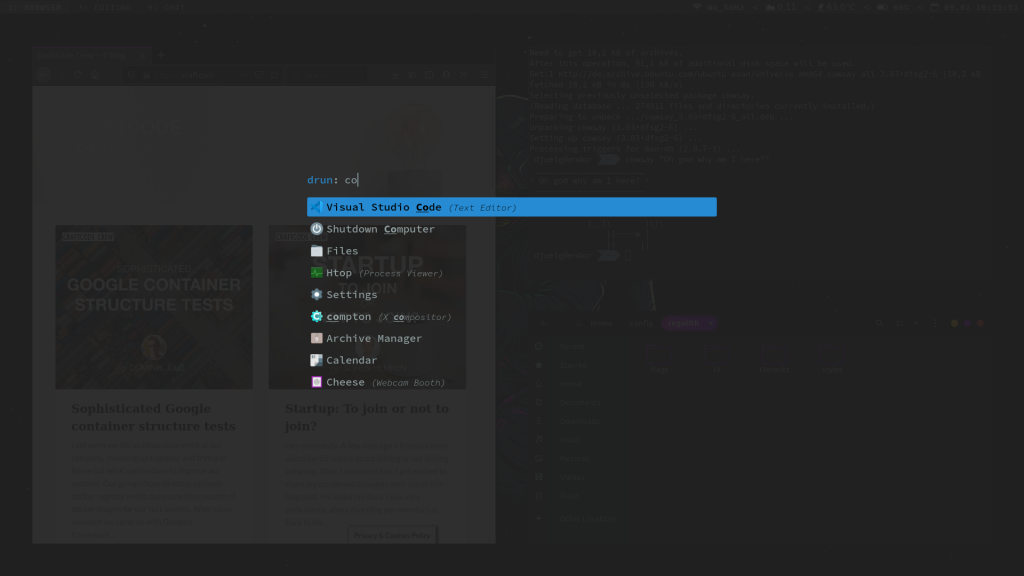
Here are two sample images of the system we’re trying to create.
Components
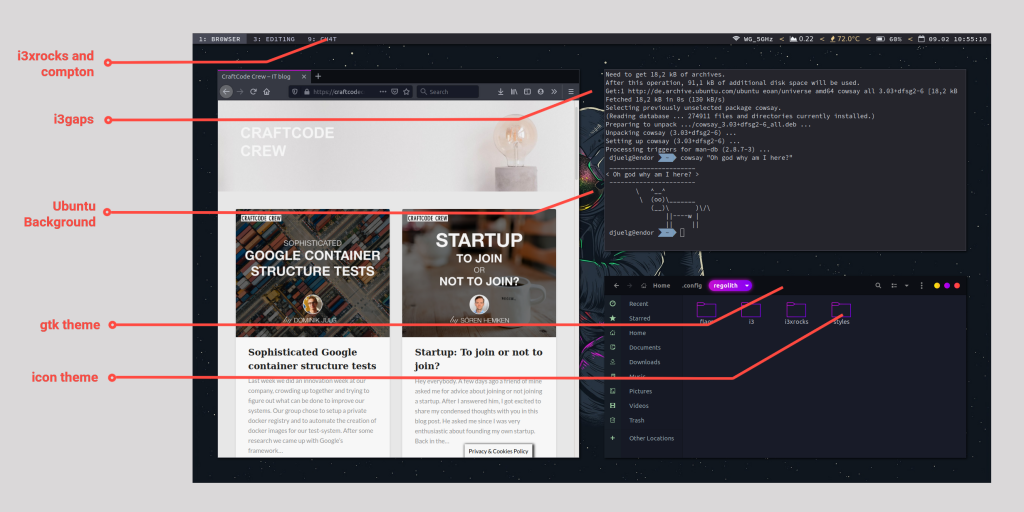
Regolith consists of a couple components to make configuration easier. In the screenshot below you can see where each component comes into play. (and how your system should look like at the end of this tutorial)
The screenshot can give a first impression, but it doesn’t contain all the components that are involved. Rofi for example can be seen in the second preview picture. Let’s dig a little bit deeper to get a better understanding of configuration:
| Component | Description | Influencing style of |
| i3gaps | i3gaps is a fork of i3 with additional functionality. i3 is a dynamic tiling window manager, but you probably know it already if you chose to read this post. | i3xrocks |
| Xresources | Xresources is a user-level configuration dotfile, typically located at ~/.Xresources . This is more or less our “root-config” that loads all other component-configs | everything |
| Rofi | Rofi, will provide the user with a textual list of options where one or more can be selected. Mostly for running an application, or selecting a window | – |
| i3xrocks | i3xrocks is a Regolith-fork of i3blocks that uses Xresources. i3blocks generates a status bar with user-defined blocks like a clock | – |
| compton | Compton is a compositor for X based on Dana Jansens’ version of xcompmgr. Kurzgesagt, it renders your display-output. | i3gaps, i3xrocks, Rofi |
Creating a Custom-Theme
So now we’re getting to the fun part. All the proposed components have their own system-global configuration files. At the end of the Regolith Customize wiki page, you can see each configurations’ location.
Setting a background image
Let’s start out easy. Since Regolith handles the integration between your Ubuntu settings and the i3-wm you can use the Ubuntu settings to replace your background image. Hit SUPER+C and navigate yourself to the background tab. If you want you can download my wallpaper here.
Staging configuration files
First, we need to stage the Xresources file, which means to copy it to a user-accessible location. Furthermore, we need to create a folder to stage our other configuration files:
$ cp /etc/regolith/styles/root ~/.Xresources-regolith
$ mkdir ~/.config/regolith/
If you take a look at the Xresources config, you can see that all it does is referencing these configurations:
- Color theme
- System font
- GTK Theme
- st-term (Regolith default terminal)
- i3-wm
- i3xrocks
- Rofi
- Gnome
We’re heading for the files in the “styles” folder. They are only for theming, so don’t confuse them with the config files that change the applications’ behavior like “~/.config/i3/config”. Let’s stage some of these style-configs and apply our new styles:
$ mkdir ~/.config/regolith/styles/
$ cp /etc/regolith/styles/color-nord ~/.config/regolith/styles/custom-coloring
$ cp /etc/regolith/styles/theme-regolith ~/.config/regolith/styles/theme-sweet
$ cp /etc/regolith/styles/i3-wm ~/.config/regolith/styles/i3-wm
A custom coloring scheme
These are the colors that will be used in your desktop environment. Just copy the content into your own file. If you want to define your own colors coolors.co is a good starting point to get inspiration 🙂
--- File: custom-coloring ---

! Custom colors
#define color_base03   #26262d
#define color_base02   #474956
#define color_base01   #4c4d5b
#define color_base00   #c0c3db
#define color_base0    #edf2ff
#define color_base1    #E5E9F0
#define color_base2    #ECEFF4
#define color_base3    #f2f5f9
#define color_yellow   #edcd8e
#define color_orange   #e59572
#define color_red      #e57472
#define color_magenta  #908dc4
#define color_violet   #9d8dc4
#define color_blue     #81A1C1
#define color_cyan     #88C0D0
#define color_green    #A3BE8C
GTK and icon theme
--- File: theme-sweet ---

#define gtk_theme       Sweet-Dark
#define icon_theme      Sweet-Purple
For this to work, you need to copy the Sweet icon-theme and Sweet GTK theme onto your machine. Of course, you are free to choose whatever theme you like. Their names (Sweet-Dark for the theme and Sweet-Purple for the icons) are defined in their config files both named “index.theme”. My setup is available here:
- Sweet-Theme: https://www.gnome-look.org/p/1253385/
- Candy Icons: https://www.pling.com/p/1284047/
You need to copy them to one of the two possible paths:
Theme: ~/.themes/ or /usr/share/themes/
Icons: ~/.icons/ or /usr/share/icons/
i3-wm config
The i3-wm config (for i3gaps) defines which color from our custom-coloring file is used for what. Furthermore, it defines how workspaces are displayed in i3bar and how i3xrocks looks in general. So now is the time to define which workspace should be used for which use-case. In my case I have separate workspaces for
- Browser
- Terminals
- Text Editing (VS-Code)
- Coding (IDE’s like IntelliJ)
- Chatting
- Music
All the other workspaces are used randomly, thus called “Other”.
--- File: i3-wm ---

#define Q(x) #x
#define QUOTE(x) Q(x)

#define glyph typeface_bar_glyph_workspace

i3-wm.bar.font: typeface_bar

i3-wm.bar.background.color: color_base03
i3-wm.bar.statusline.color: color_base00
i3-wm.bar.separator.color: color_yellow
i3-wm.bar.workspace.focused.border.color: color_base02
i3-wm.bar.workspace.focused.background.color: color_base02
i3-wm.bar.workspace.focused.text.color: color_base2
i3-wm.bar.workspace.active.border.color: color_base02
i3-wm.bar.workspace.active.background.color: color_base02
i3-wm.bar.workspace.active.text.color: color_base00
i3-wm.bar.workspace.inactive.border.color: color_base03
i3-wm.bar.workspace.inactive.background.color: color_base03
i3-wm.bar.workspace.inactive.text.color: color_base00
i3-wm.bar.workspace.urgent.border.color: color_red
i3-wm.bar.workspace.urgent.background.color: color_red
i3-wm.bar.workspace.urgent.text.color: color_base3

i3-wm.client.focused.color.border: color_base03
i3-wm.client.focused.color.background: color_base01
i3-wm.client.focused.color.text: color_base3
i3-wm.client.focused.color.indicator: color_blue
i3-wm.client.focused.color.child_border:

i3-wm.client.focused_inactive.color.border: color_base03
i3-wm.client.focused_inactive.color.background: color_base02
i3-wm.client.focused_inactive.color.text: color_base0
i3-wm.client.focused_inactive.color.indicator: color_base02
i3-wm.client.focused_inactive.color.child_border:

i3-wm.client.unfocused.color.border: color_base03
i3-wm.client.unfocused.color.background: color_base02
i3-wm.client.unfocused.color.text: color_base0
i3-wm.client.unfocused.color.indicator: color_base02
i3-wm.client.unfocused.color.child_border:

i3-wm.client.urgent.color.border: color_base03
i3-wm.client.urgent.color.background: color_red
i3-wm.client.urgent.color.text: color_base3
i3-wm.client.urgent.color.indicator: color_red
i3-wm.client.urgent.color.child_border:

#define glyph_font QUOTE(typeface_bar_glyph)
#define WORKSPACE_NAME(INDEX, NAME, FONT) INDEX<span font_desc=FONT> INDEX: NAME </span>

i3-wm.workspace.01.name: WORKSPACE_NAME(1, BR0WSER, glyph_font)
i3-wm.workspace.02.name: WORKSPACE_NAME(2, T3RM, glyph_font)
i3-wm.workspace.03.name: WORKSPACE_NAME(3, ED1T1NG, glyph_font)
i3-wm.workspace.04.name: WORKSPACE_NAME(4, C0D1NG, glyph_font)
i3-wm.workspace.05.name: WORKSPACE_NAME(5, C0D1NG, glyph_font)
i3-wm.workspace.06.name: WORKSPACE_NAME(6, 0TH3R, glyph_font)
i3-wm.workspace.07.name: WORKSPACE_NAME(7, 0TH3R, glyph_font)
i3-wm.workspace.08.name: WORKSPACE_NAME(8, 0TH3R, glyph_font)
i3-wm.workspace.09.name: WORKSPACE_NAME(9, CH4T, glyph_font)
i3-wm.workspace.10.name: WORKSPACE_NAME(10, MUS1C, glyph_font)
i3-wm.workspace.11.name: WORKSPACE_NAME(11, 0TH3R, glyph_font)
i3-wm.workspace.12.name: WORKSPACE_NAME(12, 0TH3R, glyph_font)
i3-wm.workspace.13.name: WORKSPACE_NAME(13, 0TH3R, glyph_font)
i3-wm.workspace.14.name: WORKSPACE_NAME(14, 0TH3R, glyph_font)
i3-wm.workspace.15.name: WORKSPACE_NAME(15, 0TH3R, glyph_font)
i3-wm.workspace.16.name: WORKSPACE_NAME(16, 0TH3R, glyph_font)
i3-wm.workspace.17.name: WORKSPACE_NAME(17, 0TH3R, glyph_font)
i3-wm.workspace.18.name: WORKSPACE_NAME(18, 0TH3R, glyph_font)
i3-wm.workspace.19.name: WORKSPACE_NAME(19, 0TH3R, glyph_font)
Using our new configurations
Now we can finally make use of our new config files. Therefore we need to replace the reference in our .Xresources-regolith file. In the end it should look something like this: (make sure to replace USER with your username)
--- File: .Xresources-regolith ---

! This is the Regolith root-level Xresources file.
!
! -- Styles - Colors
!
! Uncomment one and only one of the following color definitions:
#include "/home/USER/.config/regolith/styles/custom-coloring"

! -- Styles - Fonts
! NOTE: Font packages may need to be installed when enabling typefaces.
! Uncomment one and only one of the following font definitions:
#include "/etc/regolith/styles/typeface-sourcecodepro"
!#include "/etc/regolith/styles/typeface-ubuntu"

! -- Styles - Theme
! NOTE: GTK theme and icon packages may need to be installed when enabling themes.
! Uncomment one and only one of the following theme definitions:
!
#include "/home/USER/.config/regolith/styles/theme-sweet"

! -- Applications
! These files map values defined above into specific app settings.
#include "/etc/regolith/styles/st-term"
#include "/home/USER/.config/regolith/styles/i3-wm"
#include "/etc/regolith/styles/i3xrocks"
#include "/etc/regolith/styles/rofi"
#include "/etc/regolith/styles/gnome"
As you can see, we also replaced the system font from typeface-ubuntu to typeface-sourcecodepro. Now save, logout and back in, so that your changes can be applied.
Conclusion
That’s it! Now your system should be really similar to the screenshots above 🙂 As you can see customization is pretty straightforward as soon as you got a basic understanding of the used components and their configurations. If you want take a look at staging your own i3- and i3xrocks config files, to use your new desktop environment to the fullest. Alternatively, you can take a look at my dotfiles to get a glimpse of my system. Whatever you do, have fun tweaking your UI!
Greetings, Domi


